


By John Keefover of Keefography
GEAR REVIEW OF THRU-HIKING THE SUPERIOR HIKING TRAIL SUMMER ‘22
After completing my Solo NOBO Thru-Hike of the Superior Hiking Trail I wanted to share with you all my gear load out of everything I brought with me for 310 miles! For more information about the trail itself check out my article HIKING & BACKPACKING THE SHT. This gear list includes a short review of some of the items used as well. Before you head out on a big trip it’s always good to take a shorter “Shakedown Hike” that will really help dial in all of your gear. Unfortunately I didn’t have the opportunity to do one before this Thru-Hike. My Shakedown was the first 3 days of the trip until I hiked to my apartment not far off of the trail in Duluth. Once I got home I made some changes. The biggest change was actually leaving my camera behind! This trip was more about the experience than the photos. After many trips with a heavy pack and a ton of camera equipment I’ve really leaned into the Ultralight aspect of backpacking. To me it’s much more enjoyable on trail and better for the body long term. That being said I still bring all of the essentials so that I’m safe and ready for anything out in the wilderness. Every trip you learn something new about your gear and what you can leave behind or bring with on the next one.
Disclaimer: all of this gear was paid for with my own money (With the exception of the Chicken Tramper Ultralight Gear Shoulder Strap Zipper Pocket which was sent to me) and this blog is not sponsored at all, nor are these affiliate links of any kind. I’m merely suggesting what works for me, and what works for me may not work for you either. A lot of these items are from Cottage Companies that have long lead times to produce and are quite expensive, but you’re paying for the quality craftsmanship. If you are just getting into backpacking I would suggest buying used gear first at a reduced price just to help get you out on trail and then go from there. A great resource in the Duluth, Minnesota area is the Great Lakes Gear Exchange which is a used outdoor gear consignment shop. It just so happens that I also work there as well when I’m not out hiking or taking pictures! I love talking about gear and trips people are preparing for.
* Indicates worn weight on my body or a consumable material that is typically not counted towards base weights. “Base Weight” in backpacking is your total pack weight minus worn weight items and consumables like water, food & fuel.
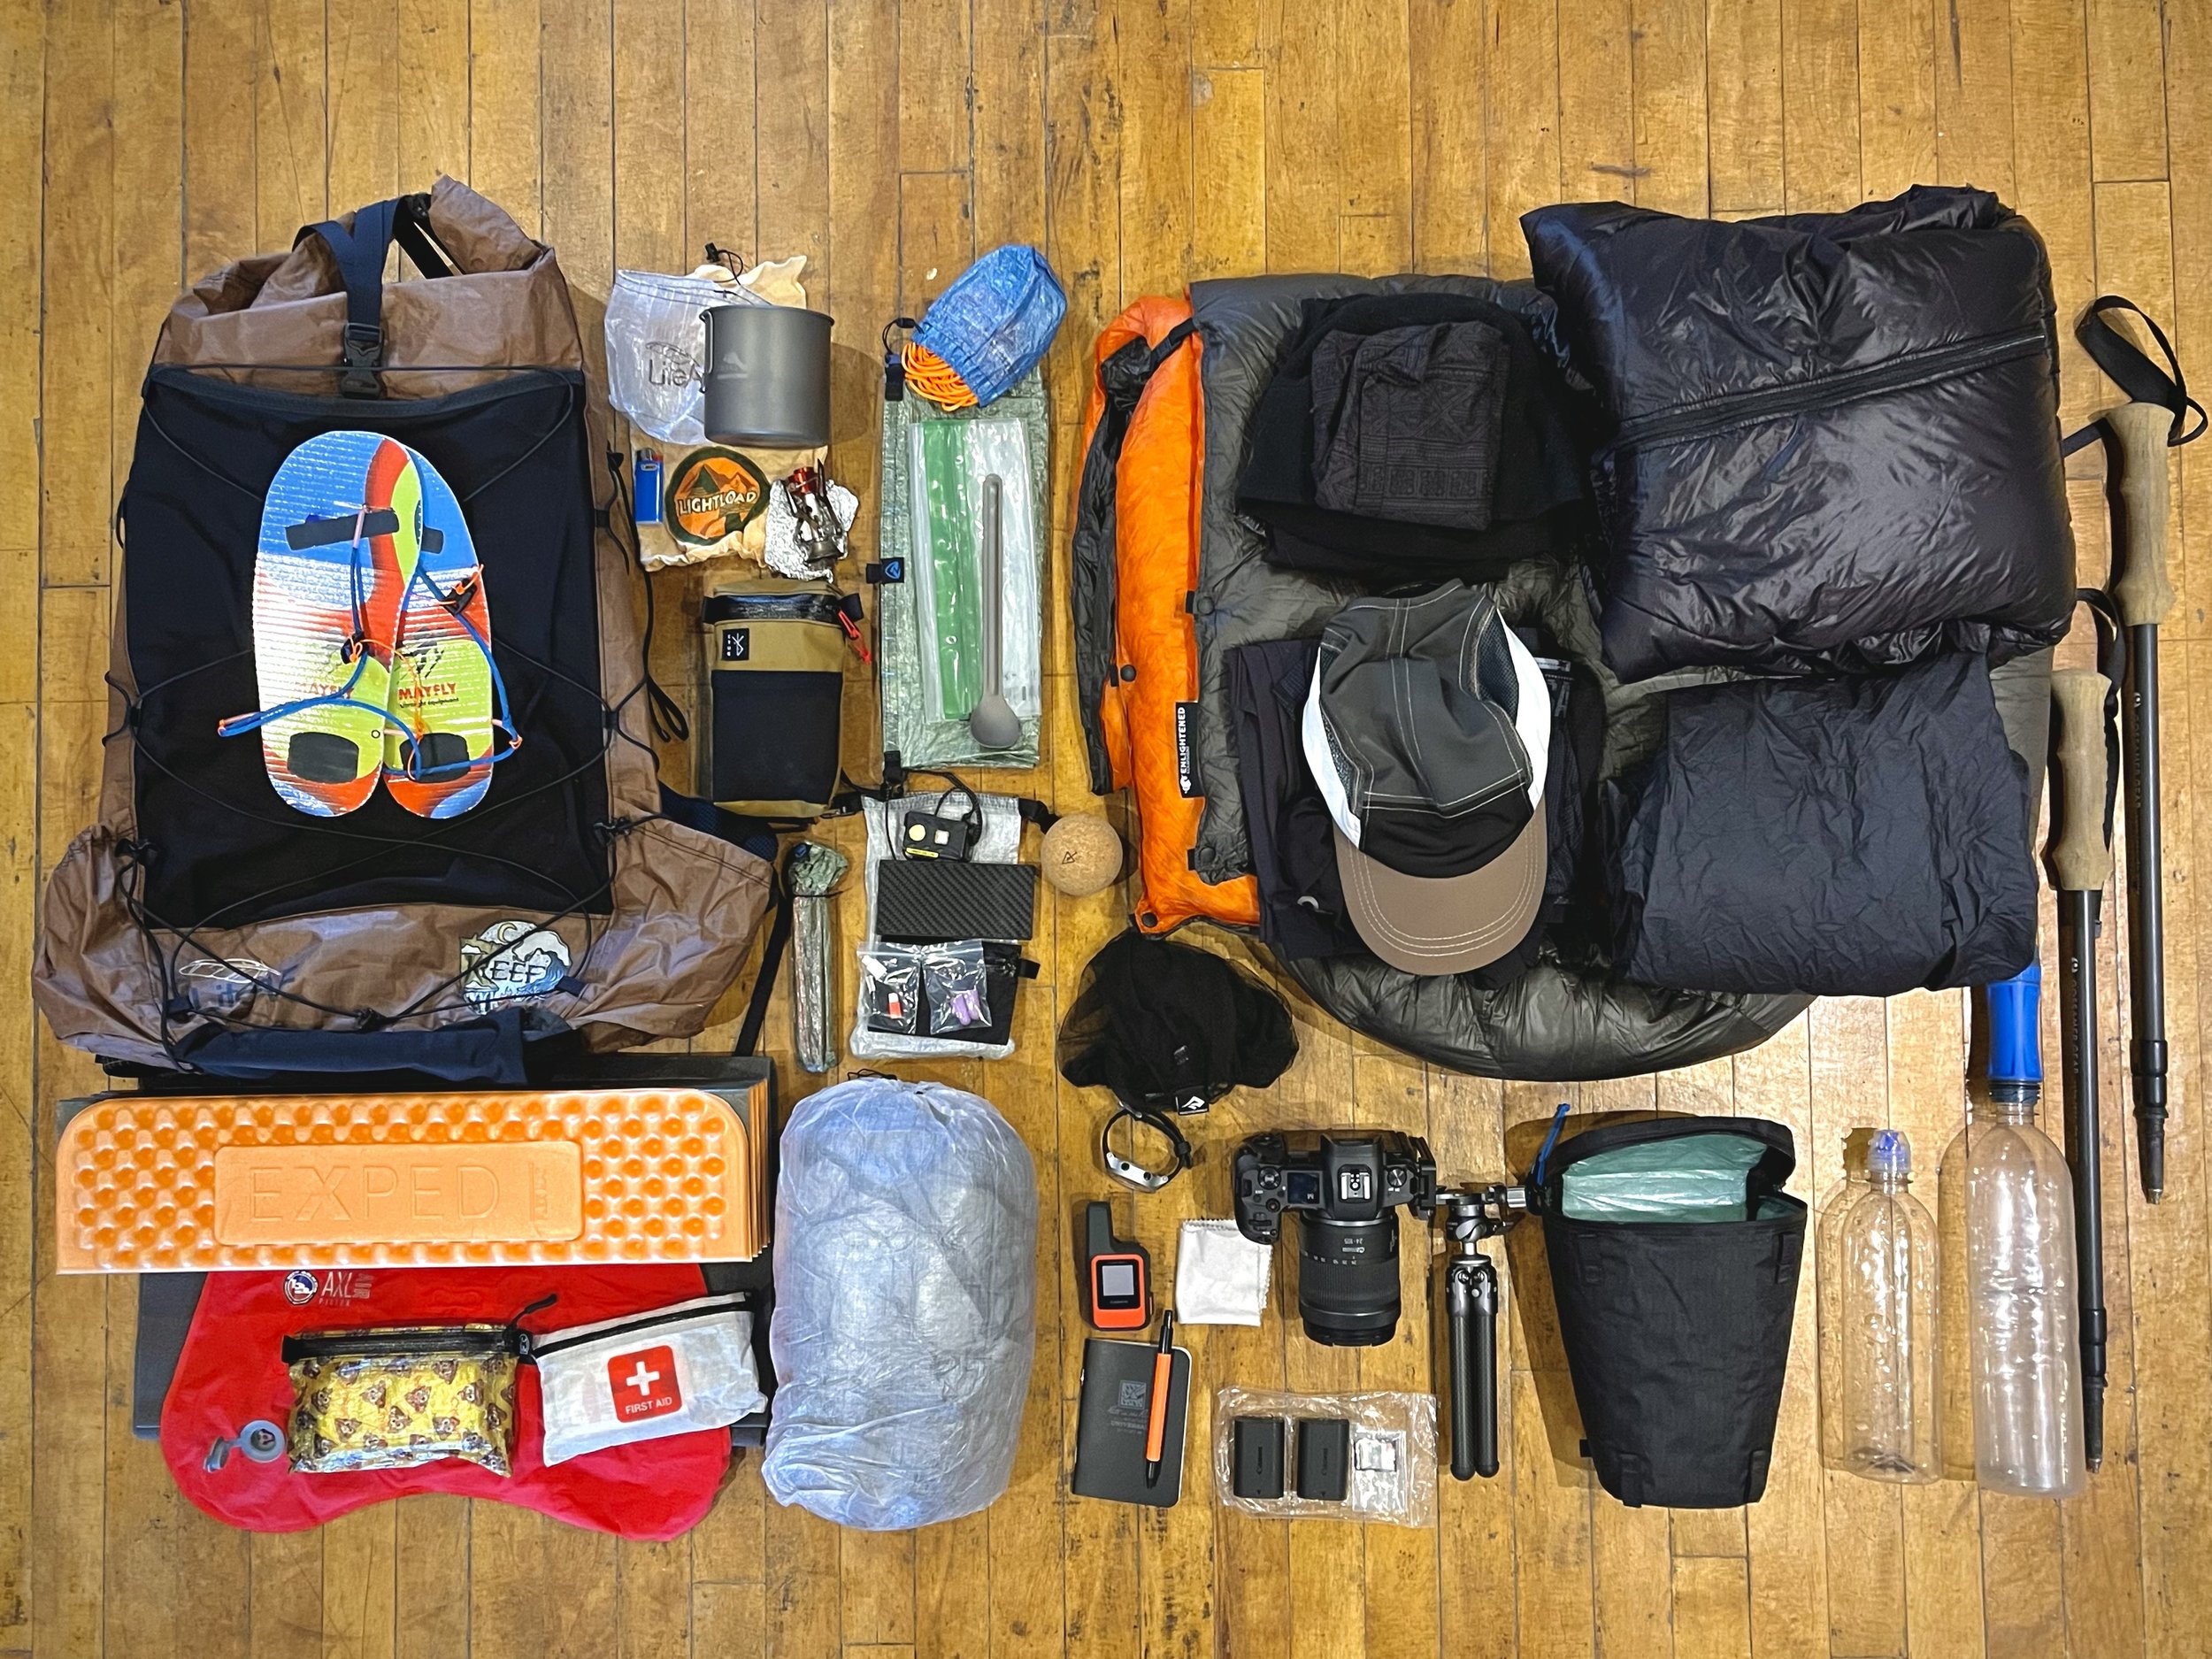
BACKPACK
Backpack: LiteAF Curve 40L Full Suspension Custom Pack 27oz
Pack Liner: Nylofume Pack Liner 0.9 oz
Shoulder Pocket: Chicken Tramper Ultralight Gear Shoulder Strap Zipper Pocket 1.6 oz
1.84 lbs
CHANGES: No changes to this part of my kit.
REVIEWS: The LiteAF backpack was comfortable and worked well, but might’ve actually have been too much backpack for this trip with frequent re-supply points on trail. I could probably get away with something even smaller like my LiteAF Multi-Day 20L backpack.
The Nylofume Pack Liner kept everything dry at the bottom of the pack.
The Chicken Tramper Ultralight Gear Shoulder Strap Zipper Pocket fit almost all of my daily snacks inside the pocket for easy access while hiking. After eating a snack on the move I put the wrapper in the very bottom stretchy pocket underneath the LiteAF backpack and made sure to put them in my garbage bag later. The stretchy pocket on the outside of the shoulder pocket held my clip on sunglasses for my prescription sunglasses as well as a notebook & pen for writing down stories and trail conditions along the way. Sometimes I would put my bug head net in there as well or my watch if I wanted to take that off.
THOUGHTS: For summer or shorter trips I would switch to my 20L backpack.
SHELTER
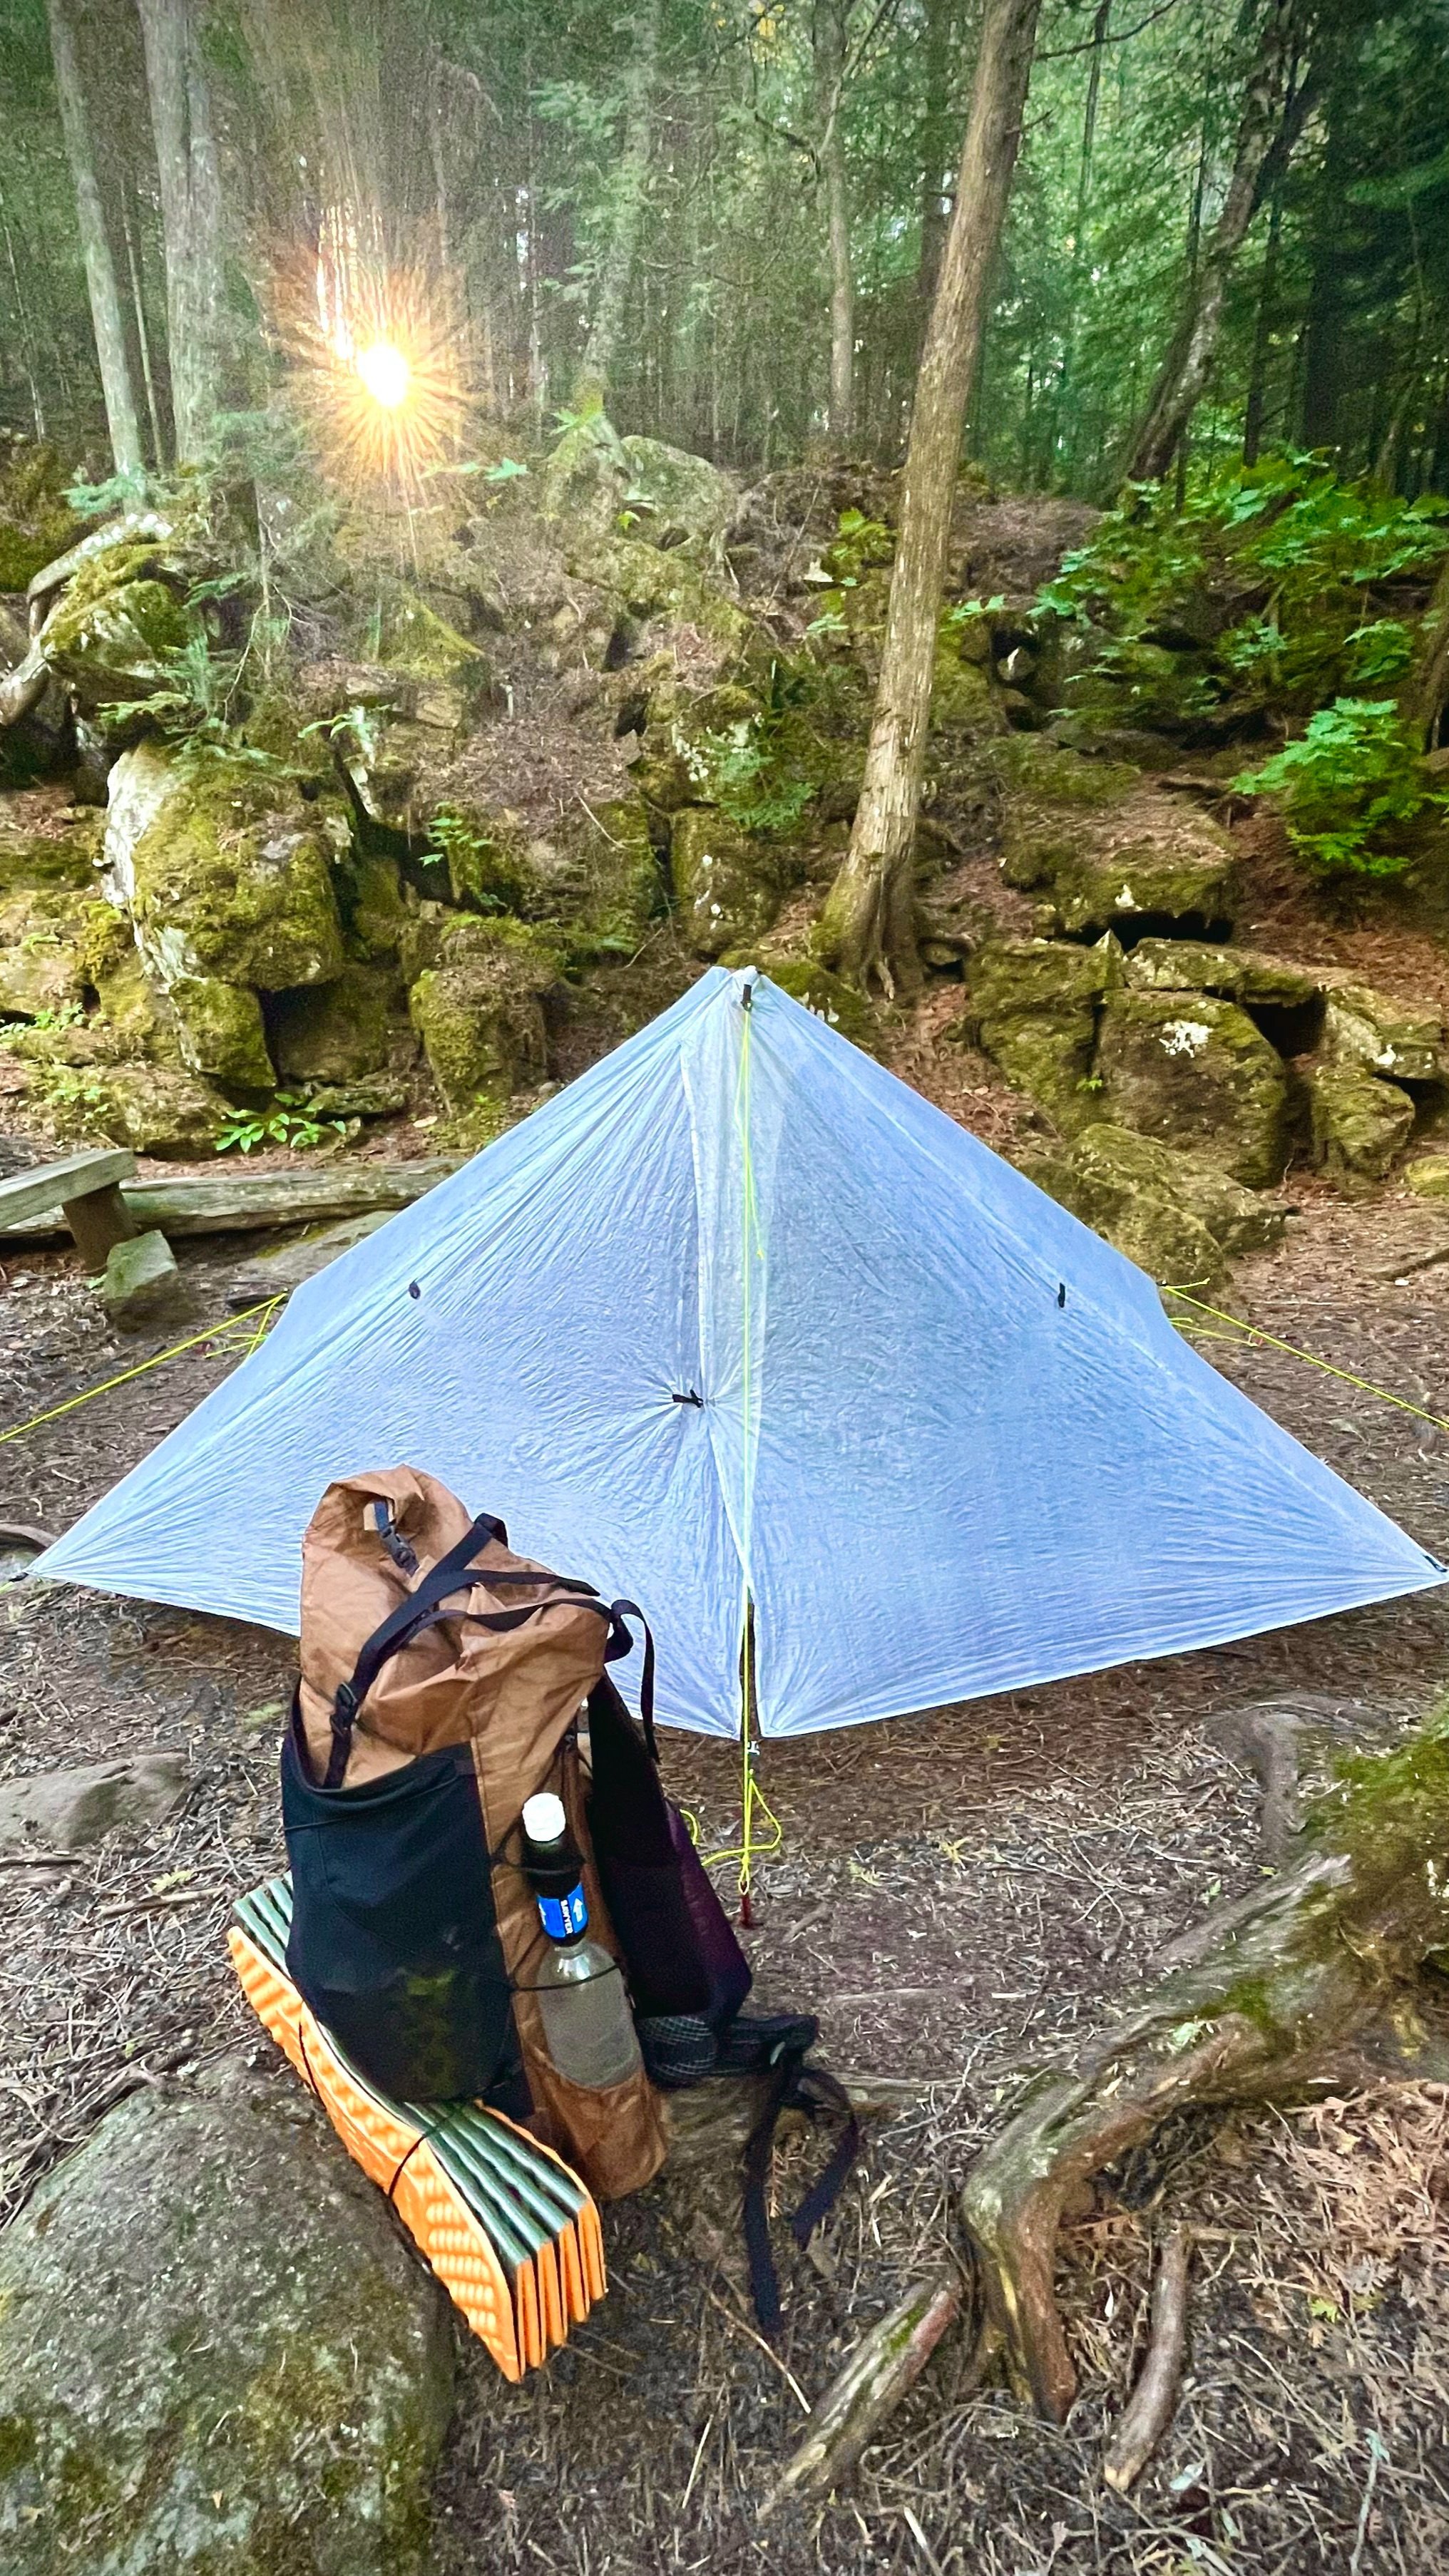
Tent: Zpacks Duplex 18.6 oz
Tent Stuff Sack: Zpacks stuff sack that came with tent 2.8 oz
Tent Stakes MSR Mini Ground Hog Stakes x8 0.34 oz each
Tent Stake Bag: Zpacks Stake Sack 0.09 oz
1.36 lbs
CHANGES: No changes to this part of my kit.
REVIEWS: The Zpacks Duplex held up great in the rain we did have. Didn’t notice any splashes over the bathtub floor at all. Condensation wasn’t much of an issue either except for on the most humid days. Even then a quick wipe down with a buff took care of it and I just aired out the tent before setting it up again later. The Duplex seemed like too much tent for 1 person. Originally my friend was going to join me for this trip, but he had to bail after day 2 due to an injury. The tent was adequate size for the both of us. I feel like the footprint took up too much room for just me at some of the more busy campsites though. It also doesn’t pack down very well being a DCF tent.
THOUGHTS: For more solo trips will switch to my Zpacks Plex Solo tent.
SLEEP SYSTEM
Sleeping Bag: Enlightened Equipment Custom Enigma 30 degree quilt 16.84 oz
Sleeping Pad: Exped Flexmat XS 7.5 oz
Foam Pad: Gossamer Gear Thinlight Foam Pad - 1/8" 2.5 oz
Pillow: Big Agnes AXL Air Pillow 1.6 oz
1.77 lbs
CHANGES: No changes to this part of my kit.
REVIEWS: The Enlightened Equipment Enigma 30 degree quilt was great for this specific trip. During the course of 19 days there was some pretty extreme temperature swings ranging from the lower 40’s to upper 90’s! Especially the farther north you get the colder it gets as well. I could’ve potentially gotten away with my 50 degree quilt if wearing all of my layers at night. Some nights I did sweat quite a bit in the 30 degree quilt.
The Exped Flexmat XS sleeping pad worked well. I found it most comfortable to lay on my stomach. It’s hard for me to sleep on my back even in my own bed. I usually am a side sleeper but found my hips would get sore after awhile and would toss and turn throughout the night to the other side. XS torso length was fine as I would use my backpack and extra clothing under my feet where the pad stopped.
Under the Exped CCF Sleeping pad I used a long 1/8” thick foam pad from Gossamer Gear that adds a little bit more cushion. It also helped keep me and my sleeping pad from sliding around the bathtub floor of the tent. This pad was folded up and packed in the inside of my backpack against my back for more padding while hiking as well. It’s probably something that could be left behind on trips where I want to go even lighter, but I’m glad I had it with me. Mostly because I had a friend join me for a night who had forgotten his sleeping pad in the car so I was able to give him that little pad for at least a little bit of comfort.
The Big Agnes pillow worked just fine, especially with my buff around it as a pillow case. Sometimes I didn’t even use the pillow though. I don’t always use one at home either to be honest. It’s nice to have for the weight.
THOUGHTS: For summer trips will switch to my lighter and more compact 50 degree quilt. May possibly leave the Thinlight pad behind depending on the trip.
UTILITY
Phone: iPhone 13 Mini w/ Pelican Case 6.1 oz*
Satellite Messenger: Garmin inReach Mini 2 3.5 oz
Power Bank: Nitecore NB10000 5.33 oz
Charging Cable: 4” Micro USB Cable to Charge Headlamp 0.26 oz
Lightning Adapter: Micro USB to Lightning Adapter to charge phone 0.04 oz
USB C Adapter: Micro USB to USB C Adapter for charging inReach Mini 2 0.04 oz
Headlamp: Nitecore NU25 with shock cord band 1.1 oz
Bug Head Net: Sea to Summit Mosquito Head Net with Insect Shield .074 oz
Ear Plugs: Ear Plugs in small bag 0.04 oz
Pocket Knife: Victorinox Classic 0.74 oz
Whistle: Whistle 0.20 oz
Wallet: Zpacks Wallet with cards, cash and keys 1.8 oz
Sunglasses: Clip on sunglasses for prescription glasses and the case 0.73 oz
Notebook: Rite In The Rain Waterproof Notebook 0.75 oz
Pen: Rite In The Rain Waterproof Pen 0.36 oz
Ditty Bag: Hilltop Packs Small Dry Bag Roll Top 1.43oz Dyneema 0.38 oz
Massage Ball: Rawlogy "OG" Cork Massage Ball - Classic Medium 1.4 oz
1.47 lbs
CHANGES: No changes to this part of my kit.
REVIEWS: The Garmin inReach Mini 2 was a great last minute addition to the trip. Mostly so that I could livestream my GPS location in real time so that others could follow along with me. People really seemed to enjoy that, especially my family members and friends who came out to join me along the way. I also used it a couple of times to get a Weather report when I didn’t have cell phone service.
To charge my phone I used two Nitecore NB10000 portable chargers. I had one in a later food re-supply drop so I wasn’t carrying them both the whole time. I also had a smaller 5000 charger that I had in my very last re-supply which ended up being the perfect amount of charge to top off my phone for the last day. Wish I had brought along a wall charging block for the few times I was near an outlet, mostly at restaurants in towns to get real food for a change.
The cord that I used to charge from the power bank was a very small 4” Micro USB cord that can charge my headlamp. To charge my phone I have a Micro USB to Lightning adapter that connects to that cord. Speaking of headlamp I used it was the Nitecore NU25 with a shock cord modification switching out the stock electric band. I think I used it once and didn’t even need to use it then really, but you always want to have a light on you in case something happens. I needed another little adapter to charge the inReach Mini 2 since that has a USB C port so I brought a Micro USB to USB C adapter as well.
The bugs were absolutely horrendous so I was glad to have the bug head net. The Sea to Summit head net worked just fine and packs away anywhere. I also treated all of my clothing in permethrin to help keep bugs off in general.
I could’ve probably done without the whistle, but like a headlamp it’s something that you’d want in case of emergency and it weighs practically nothing.
The Rite in the Rain pen & notebook were recommended at a NOLS Wilderness First Aid class I attended as they’re both waterproof so you can still write in all conditions. I kept a daily journal on trail so that I can write a trip report to pair with photos from the adventure. I completely filled 3 journals on trail! Stay tuned for those trip reports to come out soon!
I really didn’t use the Rawlogy Cork Massage Ball all that much. I stretched out enough without it or sometimes used my trekking pole on sore muscles as well.
THOUGHTS: Bring a wall charger for electronics depending on the trip. Ditch the whistle. Massage Ball as well possibly depending on how my body is feeling.
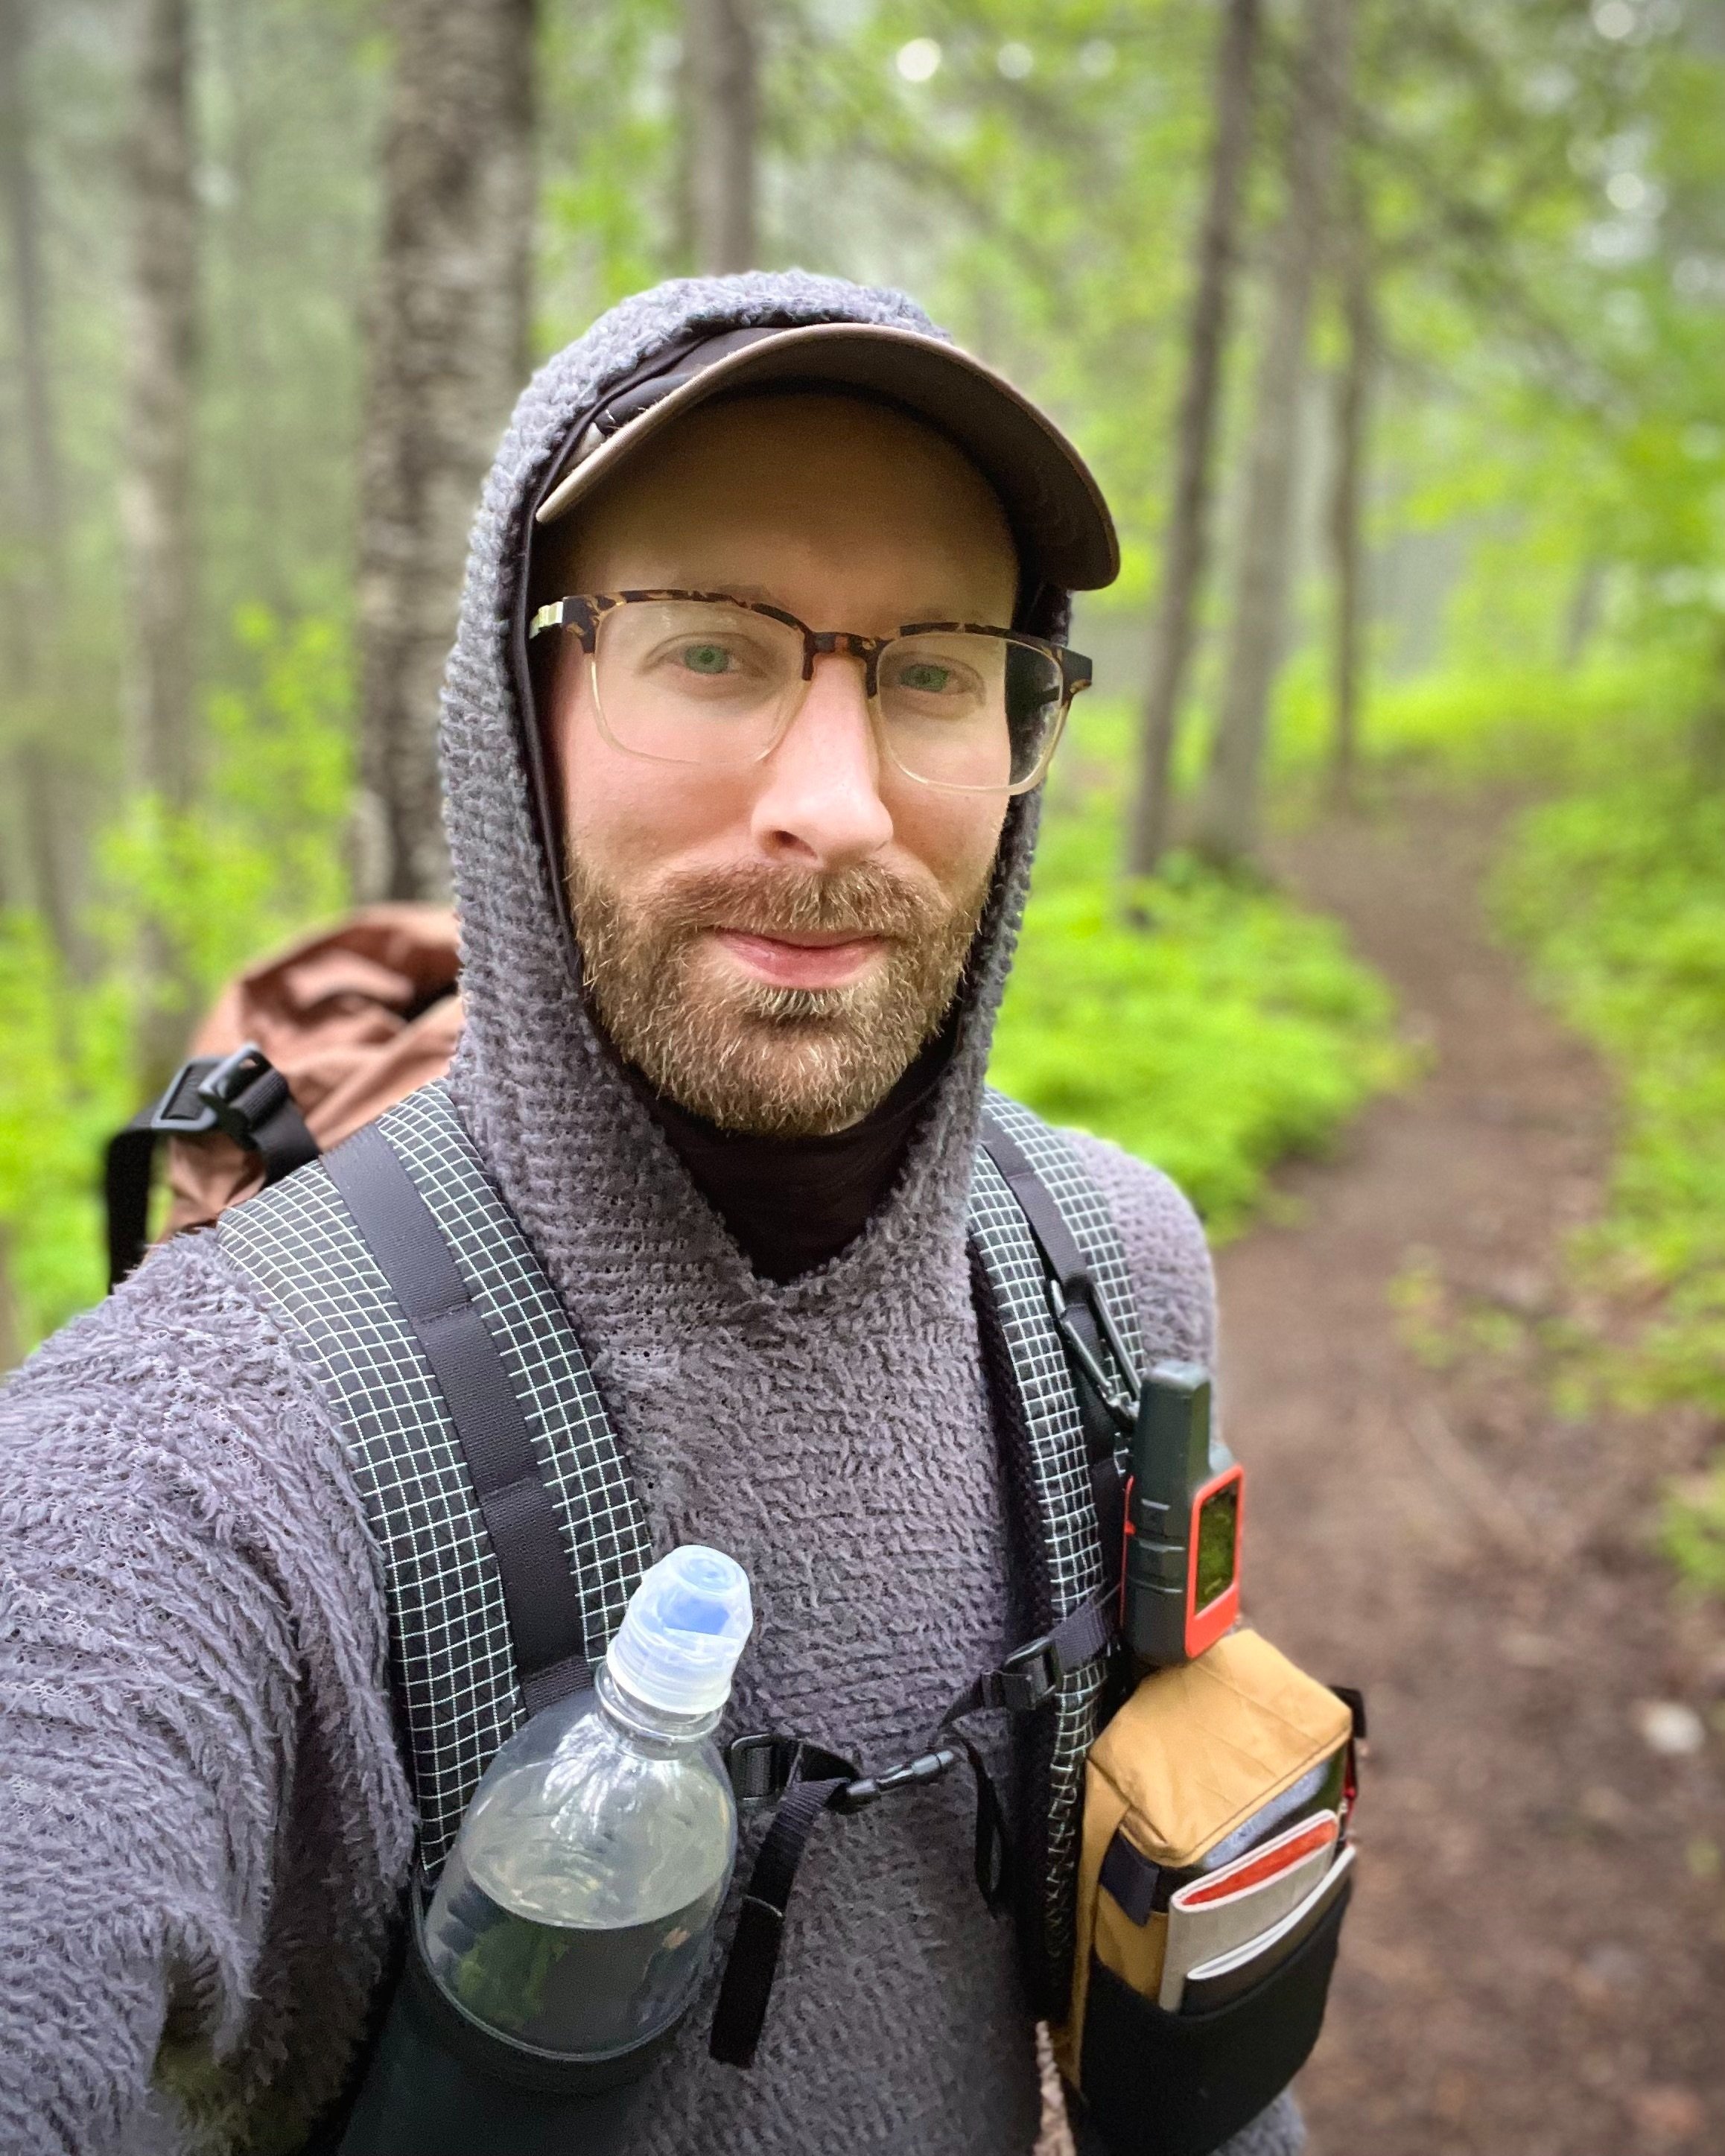
WORN CLOTHES
Trekking Poles: Gossamer Gear LT5s 4.7 oz x2*
Trailrunners: Altra Lone Peak 6 22.6 oz*
Toe Socks: Injinji Run Lightweight Mini-Crew 1.31 oz*
Pants: Patagonia Terrabonne Jogger Pants 6 oz*
Sun Hoody: Outdoor Research Echo Hoodie 4.07 oz*
Hat: Pistil Running Hat 2 oz*
Watch: Timex Watch with Alarm, Timer & Stopwatch 1.8 oz*
3.1 lbs*
CHANGES: No changes to this part of my kit.
REVIEWS: The Gossamer Gear LT5s are great lightweight trekking poles that serve a multi-purpose as the poles in my tent as well. They worked great. Though with the weight savings of Carbon Fiber trekking poles over aluminum you have to be pretty careful with them. There were a few times where they would get a little stuck in a root or rocks and my forward momentum would snag them. You have to realize what’s happening right away and stop otherwise you can easily snap them. Luckily I caught it every time it happened.
I was wearing the new Altra Lone Peak 6 Trailrunners. I don’t think they worked well for me though. After about a week my achilles was killing me and so were my ankles/feet. I never had that problem with my Lone Peak 5s and I did break in these shoes a bit before the trip as well. Zero Drop shoes can cause Achilles pain and Altras are notorious for the heel to rub up against your Achilles and cause stress. I’ll likely be switching to a different style of Trailrunner soon.
Injinji toe socks really help separate my toes that are naturally crammed together and prevent blisters. I did get 2 blisters pretty early on but I mostly contribute those to the completely flooded snowmobile trails the SHT follows for many miles in the Southern section. There’s nothing worse than putting wet, cold toe socks on in the morning though!
Like the toe socks, the Saxx Quest 2.0 Boxer Briefs helped with separation down there and I never had any issues with chaffing. Though I was also applying Squirrels Nut Butter as well to help with that.
I’m glad I went with pants over shorts. I was often hiking in cold and wet conditions with lots of brush on the trail. The Patagonia joggers are super light and stretchy and I didn’t overheat in them even on the 95 degree day.
I'm all about the Outdoor Research sun hoody. The long sleeves have thumbholes, and they protected me from the sun along with the hood on my neck. Even though it's a long sleeve top it's still pretty airy and kept me cool. The polyester definitely got stinky though! The pants and hoody helped with the bugs as well.
THOUGHTS: I don’t think Altra Lone Peak 6s are for me. I may try out the Hoka Speedgoat 5s. Will also switch to shorts during the warmer months as well.
PACKED CLOTHES
Buff: Buff CoolNet UV+ 1.13 oz
Beanie: Zpacks Fleece Hat 0.99 oz
Socks: Darn Tough Socks 1.45 oz
Sandals: Mayfly the Nymph (v2) 1.93 oz
Underwear: Outdoor Research Boxer Briefs 1.8 oz
Shirt: Patagonia Capilene Cool Lightweight L/S 3.2 oz
Down Jacket: Enlightened Equipment Torrid Pullover 7.91 oz
Rain Jacket: Enlightened Equipment Visp Rain Jacket Custom 5.4 oz
Rain Pants: Zpacks Vertice Rain Pants 2.8 oz
Wind Pants: Enlightened Equipment Copperfield Wind Pants Custom 1.06 oz
Wind Jacket: Zpacks Ventum Wind Shell 1.6 oz
Rain Mitts: Enlightened Equipment Visp Rain Mitts 0.95 oz
1.89 lbs
CHANGES: Took out the fleece & down booties, and added the down jacket & rain mitts.
REVIEWS: The buff was used for all sorts of things. Used it as a sleep mask, pillow case, towel to wipe down condensation inside the tent, and inside my cook pot while hiking to help muffle the sound of items bouncing and clunking around as I was hiking.
The fleece beanie was nice to keep my head warm on those really cold nights/morning and was able to pull it over my eyes as a sleep mask as well when I went to bed really early before sunset.
Having fresh & clean socks, undies, and shirt to change into was great when at camp. The wind pants acted as my main pants at camp as well. They got pretty warm on the hottest day at camp though. The wind shirt was a nice extra layer to help block the wind and keep me warm and bugs can’t get through its material.
I’m pleasantly surprised with how well the MayFly ultralight sandals held over the duration of the trip. Especially considering the rocky & rooty terrain most of the campsites have and getting wetted out by rain on the outside of the pack. Having said that I still might leave them behind and ditch camp shoes altogether on bigger trips.
Though I took out the Fleece I did bring along a Down Jacket. I didn’t use it that often either though it was nice on the coldest mornings. I pretty much mostly used it as padding underneath my legs/feet where my sleeping pad doesn’t reach. Once it starts warming up more this summer I likely won’t bring a puffy.
The rain jacket & pants were great for warmth layering and those rainy times, as well as very early morning with lots of dew. I took them off after a little bit on trail once I started warming up in the morning though.
I left the down booties behind though I did bring the rain mitts. I more used them as booties on my feet to help trap heat in there as well. I used them a couple of times hiking in the early morning when it was still quite cold. Probably wouldn’t bring these on warmer summer trips.
THOUGHTS: Probably didn’t need the Down Jacket but there were a couple mornings where it was nice to have it. Might leave the sandals behind as well and just go barefoot in my trailrunners at camp. Rain mitts aren’t needed in hotter summer months.
WATER FILTRATION
Water Filter: Sawyer Squeeze 3.25 oz
Water Bottle: .7L Smart Water Bottle w/ label removed and ring cut off 0.93 oz
Water Bottle: 1L Smart Water Bottle w/ label removed and ring cut off 1.41 oz
0.35 lbs
CHANGES: Changed from the Platypus Quickdraw water filter to the Sawyer Squeeze after about a week on trail.
REVIEWS: After about a week on trail my new Platypus Quickdraw water filter really started clogging up and the flow rate became very slow. I tried backflushing it often but it never seemed to help. I ended up switching to the tried and true Sawyer Squeeze during one of my food re-supplies and it was a such a good move. It was taking around 10 minutes for me to filter a liter of water with the Platypus, and with the squeeze it was about a minute! I think I was drinking less than I should’ve before that as it was just annoying having to sit around and filter water for so long.
THOUGHTS: The Sawyer Squeeze is the filter for me!
FOOD BAG
Food Bag: Zpacks Big Food Bag 1.2 oz
Food Bag Toggle: Dutchware PCT Bear Bag Toggle 0.1 oz
Garbage Bag: Opsak 8.875 x 9.875 0.67 oz
Cookset Bag: LiteAF Round Bottom Pot Sack Little 0.1 oz
Rock Sack: Zpacks Rock Sack 0.14 oz
Paracord: 2.0 mm Z-Line Slick Cord 1.35 oz
Carabiner: Zpacks Ultralight Mini-D Carabiner 0.1 oz
Spoon: Toaks Titanium Long Handled Spoon 0.66 oz
Stove: MSR Pocket Rocket 2 2.59 oz
Pot: Toaks Light Titanium 650ml Pot - no lid 2.22 oz
Pot Lid: Tin Foil 0.04 oz
Lighter: Mini Bic Lighter 0.4 oz
Towel: Light Load Towel Small 0.3 oz
Fuel Canister: MSR IsoPro Fuel Canister 3.5oz
Fuel: Consumable Fuel in the Canister 3.9oz*
1.08 lbs
CHANGES: My friend was going to carry all of our cooking fuel canisters but after he had to drop out of the hike early on I carried a small fuel canister and switched out to a new one on a couple re-supplies.
REVIEWS: I probably had too much paracord with me for hanging my bear bag at night. It’s not a huge deal though as it doesn’t weight that much and can be used for many other things if needed. After just using the Pocket Rocket to boil water once a night I wondered if I should try to use the lighter BRS-3000T stove again and see if I get a good one this time. That would save 2 ounces. I may even just switch to cold-soaking all together as well. I wouldn’t need to carry a stove, pot, or fuel then. I might miss having a hot meal at the end of the day but during the warmer months of summer that’s not that big of a deal.
THOUGHTS: I’m leaning towards going stoveless and cold-soaking which would save a ton of weight and simplify the cooking process.
TOILETRIES
Poop Kit Bag: Space Bear Bags Dyneema Poop Moji Pouch 0.26 oz
Toilet Paper: Coghlan's Toilet Paper 0.75 oz *
Hand Sanitizer Bottle: Litesmith Small Plastic Spray Bottle 0.3 oz
Hand Sanitizer: Easy Care First Aid Hand Sanitizer 0.1 oz *
0.09 lbs
CHANGES: Took out the Backcountry Bidet.
REVIEWS: Ah the Poop Kit! What better way to store everything than in the fun poop emoji DCF bag from Space Bear Bags!
Gotta have Toilet Paper and I just used some Coghlan’s because I have some laying around from previous trips, and because it’s also much more compact and a little lighter than a regular roll of TP. Hand Sanitizer is a must as well. I had a little Litesmith bottle and more sanitizer in every food re-supply to fill my bottle so I had some for the whole trail. A trowel is another common poop kit item for backpacking, but I didn’t need it with me on this trip. Every campsite on the SHT has a latrine and the sites are spaced out often enough where it shouldn’t be an issue getting to a toilet.
THOUGHTS: Not much else to say about that. Was pretty regular on trail with the morning constitutional.
FIRST AID KIT
First Aid Kit Bag: LiteAF First Aid Kit Bag Medium 0.36 oz
Moleskin: Adventure Medical Kits Moleskin 0.18 oz*
Bandaids: Assorted Bandaids and Pads 0.26 oz*
Fabric Repair Kit: Gear Aid Tenacious Tape Mini Patches 0.08 oz*
Wipes: Trip Ant, Alcohol Wipe and After Bite Wipe 0.12 oz*
Pills: Naproxen, Ibuprofen, Vitamins, Medications, Toothpaste tablets 0.2 oz*
Toothbrush: Garage Grown Gear Toothbrush 0.17 oz
Matches: Backup Emergency Matches 0.02 oz
Anti-Chafe Salve Stick: Squirrel's Nut Butter Stick 0.6 oz
Anti Chafe Salve: Squirrel's Nut Butter Salve Consumable 0.47 oz*
Chap Stick: Lip Naturals Mini Lip Balm SPF 15 Tea Tree Mint 0.39 oz*
0.16 lbs
CHANGES: My friend who was going to join me for the whole hike was going to carry a much larger and thorough First Aid Kit for the both of us, but he had to drop out early on. He gave me a bunch of his NSAIDS and my buddy Rob Pelton hooked me up with a whole bunch of other first aid items when he joined me for a section. Thanks Rob! Go check out his YouTube channel!
REVIEWS: This First Aid Kit is pretty minimal as mentioned above. I do have and recommend others to get Wilderness First Aid training so that you are able to take care of yourself and anyone else you might encounter on the trail.
Moleskin is great for treating blisters. Thankfully I only had the two early on like I mentioned before. I didn’t have to use any Gear Aid Tenacious Tape which can be a quick fix to any holes, rips or tears you get on trail. Always good to have though!
The Garage Grown Gear toothbrush is pretty much just a standard issue prison toothbrush, not that I’ve been to prison or anything… but it’s very minimalistic and small just a thumbprint size. I don’t use toothpaste on camping trips either. It’s not that I don’t use anything at all that’d be gross! Instead I use Toothpaste Tablets. You can count out exactly how many you need per day making them a much more sensible option over toothpaste.
I didn’t bring sunscreen at all as the trail is mostly in a shaded green tunnel and my sun hoody, hat, and pants protected pretty much every exposed part except for my hands which got quite a bit tan. The chapstick I brought along also has SPF in it so that my lips stay moisturized and don’t get sunburnt.
The Nut Butter worked quite well as I never had any issues down there with chaffing. I used it liberally daily and ran out on the last day.
THOUGHTS: It’s good to carry more First Aid Kit supplies than you might think you’ll need. You never know what can happen to you or others on trail. I also recommend everyone going out in the backcountry to get either Wilderness First Aid or Wilderness First Responder Training.
CAMERA GEAR
0.00 lbs
CHANGES: I decided to leave the camera gear behind on day 3 when I hiked to my apartment along the trail!
REVIEWS: Yes, you heard that right. I left my camera gear behind! After a few days I realized that this trip is more about the experience and less about the photos. It also saved around 4 pounds of weight from my pack. Plus phones these days are more than capable of taking good pictures and videos with ease. It felt sort of freeing not having the camera along. With the camera I felt like the scene would really need to be something special for me to take it out, dial in the settings, take the shot, and then edit it all later. With a phone I could just take it out of my pocket and record whatever I wanted to quickly and then keep on hiking! I also wasn’t out for the most ideal lighting conditions to photograph anyway. I’d often fall asleep before sunset, and was up and hiking shortly after sunrise. This trip acted as a great scouting mission with a few new locations I have in mind now after seeing the whole trail. Being that I live so close to the SHT I have plenty more opportunities to get good photos under better conditions. I still have lots of photos and videos to share with you all as well as 3 journals worth of stories and trail conditions to pair with them!
THOUGHTS: On bigger backpacking trips I may leave the camera behind as well. I’d rather be comfortable on trail. Depends on the trip though!
TOTAL WEIGHT & FINAL NOTES
13.1 lbs. If we subtract the worn weight & consumables (3.58 lb) the base weight would be 9.53 lb. Generally a base weight of 10 lbs or less is considered to be Ultralight. Water weighs 2.2 lbs per liter and for a full day of backpacking you need 1.5-2.5 lbs of food per day to keep up with the calories you’ll be burning on trail. On this trip the most food I’ll have with me at a time is 3 days worth. That means at most my pack will weigh another 2.2 lb for water and 5 lbs for food giving me a total carry weight of around 18 lbs. That’s pretty good, but it all adds up over 310 miles! There are a few luxury items included in here but will add to the overall enjoyment of the trip for a marginal weight penalty. I hope this helps any of you planning for your upcoming Thru-Hike or backpacking trip. Remember though, what worked for me may not work for you! If you have any questions on any of it drop a comment below! I always love talking about gear.
Trip Report from backpacking the 42 mile long Pictured Rocks National Lakeshore Trail. It follows sandy beaches and dramatic cliffs along Lake Superior in the Upper Peninsula of Michigan.